
Christmas is a beautiful time: time of family gatherings, richly laid tables, atmospheric decorations and shining fairy lights. We want to capture these moments, but when we get our camera, it turns out that it’s too dark, or that incandescent lights do not render the mood. Then how should we take photos to capture the Christmas atmosphere and share the perfect shots with our close ones? Here is my guide to Christmas photography.
1. Subject of the photos
Christmas is full of subjects that are worth of capturing with a camera. What do we photograph the most often during Christmas? Of course, the first thing we think about are family photos shot during Christmas Eve. However, we should not waste other opportunities to take wonderful Christmas photos. There are other activities that would make beautiful Christmas photos, such as:
-preparing food for Christmas dinner (e.g. baking cookies)
-making Christmas decorations
-decorating the Christmas tree with your family
-laying the Christmas table
-…and children crying while they are being dressed in festal (uncomfortable) clothes

2. Christmas white balance
What makes taking Christmas photos difficult is the fact that they are usually taken inside, and in artificial light. These photos very often are in unnatural, orange shades. How can we change that? It’s very simple. Before you start taking photos, take a look at the lighting in the room. Then, find “white balance” option in your camera and set white balance accordingly (e.g. incandescent lights). If your camera allows RAW image format, you can change white balance later with graphics software.

3. Diffuse or reflect the light of flash
Another popular problem with Christmas photos involves the photos with flash. Usually, the photos made with a flash bulb, especially with one build in the camera, are of poor quality. The faces of guests, illuminated with the flash, seem pale and shiny, while the eyes seem red. A good way to get rid of these effects is using a diffuser, which is put on the flash bulb. If you are lucky enough to have an external flash, try to reflect the light off walls or ceiling. Another way to minimalize the significance of the flash and to produce interesting effects is switching your camera to night mode. In that way, the exposure time will be longer, but the setting still will be illuminated with flash. It will somehow neutralize the flash. It will allow you to use some of the ambient light, and the flash will ensure that the pictures are not blurry.
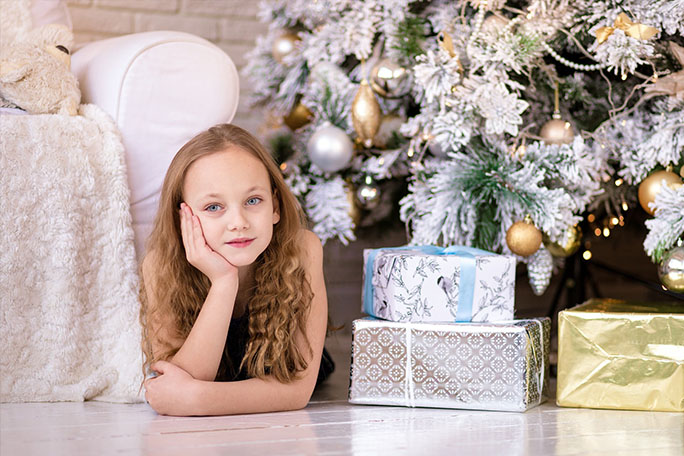
4. Macro mode and Christmas decorations
If you have macro mode in your camera, you can use it to make interesting Christmas shots. Christmas ornaments, Christmas greens, sweets in a bowl, Nativity, a wreath and other decorations can turn out to be the perfect photo subject.

5. Opening presents and continuous shooting mode
There are certain moments of Christmas Day that hold the promise of beautiful shots. One of them is opening the presents. Then you can capture the whole range of emotions and expressions of joy and happiness; especially on the faces of your children. Switch your camera to burst mode. It will allow you to take many photos during these precious moments. You will be able to capture everything, from giving a present, through the joy of unpacking it to the satisfaction (or sometimes disappointment) after unpacking it. Don’t forget to capture the emotions of the givers as well!
6. How to make a good group photo
One of the most popular Christmas photos is a group portrait, and there is nothing strange about that. After all, the Christmas is one of the only holidays when we get to see our grandparents, aunts, uncles, cousins and so on. Usually group portraits are made at the end of the evening, when the guests are tired. If you want to take a good shot, ask your guests to pose at the very beginning of the party.
7. Photographing fairy lights
Have you ever wondered how to achieve this magical effect?
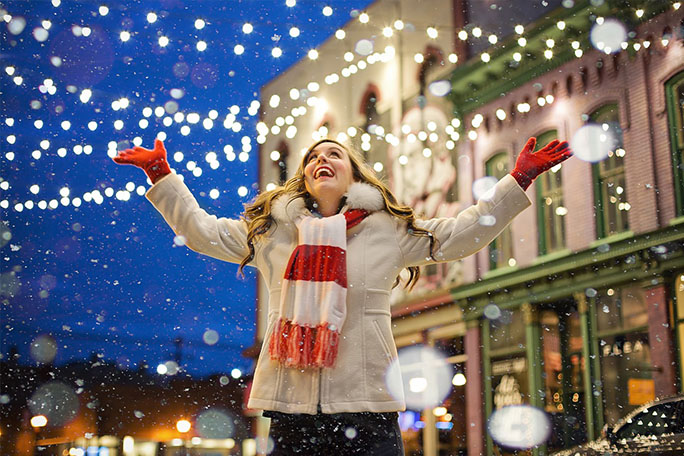
The literature on photography calls this beautiful, blurry background “bokeh”. It is not really hard to make.
Get your child to stand in front of the Christmas tree, so that the shining fairy lights are in the background. Use mode “priority to diaphragm/aperture priority” (A/Av). Set the smallest aperture (e.g f/2 or f/4). And “blur” the fairy lights on the tree or on the line in the background. Remember to pay attention to good lighting and switch off the flash. Simple, isn’t it? Remember that changing the distance between you and your subject will make the bokeh effect look different every time.

Now it’s time for your experiments, use this time to take wonderful photos! You won’t get another chance until next year.
Photo / Graphics: pixabay.com and freepik.com